Introduction

Thank you for purchasing one of our Theme Apinae WordPress. We are pleased that you have chosen Apinae for your website. You will find your answers from this documentation and it provide you with clearer details that you need to know to use Apinae Theme. If you have any questions concerning our products, please contact us on our Support Forum or directly from our themeforest account.

License

Standard Licenses

The majority of our items (themes, code, graphics, 3D and flash) are covered by our Standard Licenses. If your end product including the item is going to be free to the end user then a Regular License is what you need. An Extended License is required if the end user must pay to use the end product.

Regular

view full license

Extended

view full license
Number of end products 1 1
Use in a single end product Yes Yes
Use in a free end product
(more than one end user allowed)
Yes Yes
Use in an end product that's sold No Yes
On-demand products/services
(e.g. "made to order" or "create your own" apps and sites)
One license per each
customized end product
No
Use in stock items/templates
(See FAQ for more details)
No No

For more information regarding license regulations and policies, see the links below:

Images

All images are just used for Demo Purpose Only. They are not part of the template and NOT included in the final purchase files.

Plug-ins

Includes a number of powerful plugins such as Elementor, Contact Form 7, MailChimp, Slider Revolution. That remains your website works perfectly and stably. Every ZOZOTHEMES download includes the free premium plugin, offering significant savings. So On every theme version update release you will get updated Plugin files.

Free premium plugins:

  • Slider Revolution

Plugins compatible:

  • Woocommerce
  • Elementor
  • Contact Form 7
  • Advanced Popups
  • MC4WP: Mailchimp for WordPress
  • Slider Revolution
  • The Events Calendar
  • Cookie Information
  • WooCommerce Wishlist
  • Yith plugins
  • loco translate
  • WPML Plugin Integration
  • Polylang
  • SEO Optimized (compatible with SEO Plugins like Yoast)
  • Compatible with many cache plugins such as W3 Total Cache & WP Super Cache
  • And many more...

Help and Support

All of Our Themes come with 6 months of included support and free lifetime updates for your Theme.Once the 6 months of included support is up, you have the opportunity to extend support coverage up to 6 or 12 months further. We have an advanced, secure ticket system to handle your requests. All of our items come with free support. Feel free to post them on our Support Ticket center. We will respond as soon as possible (within 24 – 48 hours, usually faster). We are open from 9am to 7pm (IST), from Monday till Saturday. Support is limited to questions regarding the theme’s features or problems with the theme. We are not able to provide support for third-party plugins.

Item Support Includes:

  • Answering questions about how to use the item.
  • Answering technical questions about the item.
  • Help with defects in the item.
  • Item updates to ensure ongoing compatibility and to resolve security vulnerabilities.

Not Included in Item Support:

  • Theme customization and requests that require or involve custom coding.
  • Installation of the item.
  • Hosting, server environment, or software.
  • Support for compatibility with 3rd party plug-ins.
  • Support for out-dated or modified themes.

Articles

For more information regarding the theme's functionality, we suggest checking our Articles.

Token Verification

How to Verify a Token?

  • Enter your Email address in the first field
  • Enter your theme purchase code in the second field. How to get Purchase Code?
  • Click on the Activate button to activate your theme.

Attention! 1 license = 1 domain = 1 website. You can always buy more licences for this product:

Installation

WordPress Information

If you are new to WordPress, there is a step-by-step plan for getting started. Plenty of options for assistance are listed in this article. If you need help installing WordPress, below are all the useful links for WordPress information.

Theme Requirements

You need some requirements to install and use the Apinae theme.

  • max_execution_time 300
  • memory_limit 128M
  • post_max_size 32M
  • upload_max_filesize 32M
  • max_input_vars 2000

please use Strong passwords and the latest version of WordPress and all plug-ins keep updated.

Theme Installation

Unpacking the theme

When you download the theme from Themeforest, you will get an archive file in .zip extension. You need to unzip that archive file. The apinae.zip file is the Installable WordPress Theme and what you need to use to get the theme installed. Please see the following steps that how to install apinae.

In our theme package contains the main theme, child theme and documentation and demo contents too.

In order to install the theme, you need to have a working version of WordPress installed on your server first. Check out this guide.

  • Login to your WordPress Dashboard.
  • Navigate to Appearance > Themes. Click Add new button, located at the top of the screen or Add new theme
  • Click on Upload Theme button at the top of the screen.
  • Choose apinae.zip.
  • Active the theme after it is completely uploaded. To active Go to Appearance > Themes and activate the installed theme.
  • After activating the theme a notice should appear on the top of the screen, click on begin installing plugin and install the Plugins given in this theme.

There are 2 ways to install the theme:

  • Via FTP:
    1. Log into your web server with FTP client software.
    2. Unzip the apinae.zip file and ONLY use the extracted /apinae theme folder.
    3. Upload the extracted apinae theme folder into /wp-content/themes.
    4. Navigate to the Appearance > Themes tab and activate the theme.
  • Via WordPress admin panel:
    1. Log into the WordPress admin panel.
    2. Navigate to Appearance > Themes and click on Add New and Upload Theme.
    3. Select the apinae.zip folder and click Install Now button.
    4. After the successful installation, click on Activate or navigate to the Appearance > Themes and click onActivate button to activate the newly installed theme.

Attention! If you need to make changes in theme’s templates, styles or functions, we recommend install a child theme and activate before demo data import. Please see the Child Theme section for more information.

Plug-ins Installation

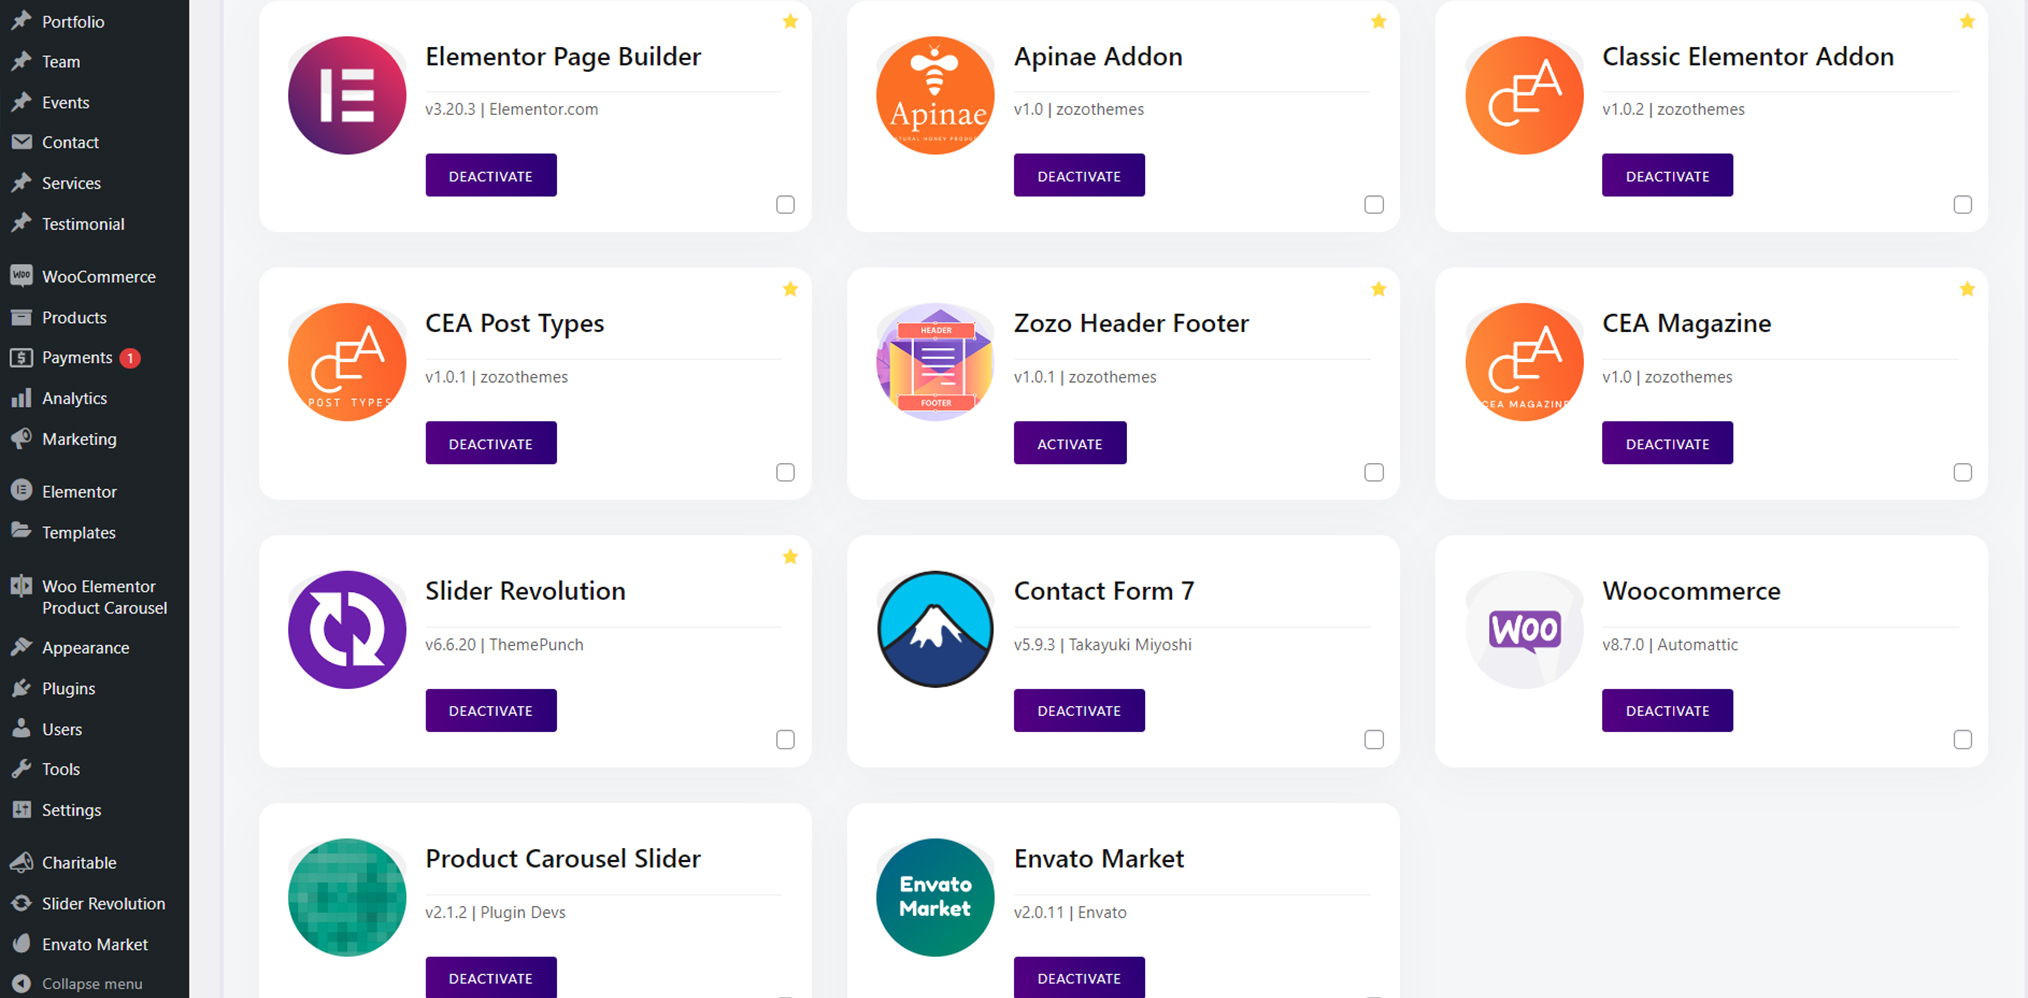
Below is the list of the plug-ins that come included into the theme.
All these plug-ins can also be installed from the WordPress.org repository and from Theme plugins.

  • Contact Form 7
  • Slider Revolution(required)
  • apinae Core (required)
  • WooCommerce
  • Elementor Page Builder (required)
  • Classic Elementor Addons Pro (required)

To make the site look exactly as on the Our demo, you must need to install all of the recommended plug-ins:

  • After the installation/activation of apinae theme, Go to Wordpress Dashboard >> Apinae >> Theme plugins here you can install all of our recommended plugins.
  • After the Installation Activate the all plugins.

Page Builder

All existing demo pages and layouts are built using Elementor Page Builder and should be customized using Elementor Page Builder only.

PLEASE NOTE! We recommend Please use one page builder for per page or post.

Child Theme

A child theme allows you to change small aspects of your site’s appearance yet still preserve your theme’s look and functionality. To understand how child themes work it is first important to understand the relationship between parent and child themes.https://developer.wordpress.org/themes/advanced-topics/child-themes/

IMPORTANT! Install the child theme before importing the demo data. Otherwise, all of your theme options will be reset.

A child theme is installed the same way you install a parent theme. Locate the apinae-child.zip file in the theme package and upload it via the WordPress admin panel. or you can unzip it and upload via FTP (see main theme installation.

Using a Child Theme

So here you can modify default funtions with funtions.php and overwrite style CSS with style.css

Demo Importer

This allows you to quickly set up your theme with One Click. We have also included the exported XML file with our demo, The XML file will give you all of our demo pages..

Install & Activate all required Plugins before the demo import.

In order to import the demo go to Theme Panel (WP Dashboard) > apinae > Demo Importer.

Whole Demo Site Content

Demo import will enable you to import all media files, pages, theme options, and plug-in settings.

In case demo data installation is stuck, you can manually install it by downloading the demo.zip archive from theme package and extract it in your Theme's folder root directory. If the issue persists, please contact your hosting service provider to make sure that your server configuration meets the Theme Requirements. Otherwise, please refer your request to our support center.

Only Pages, Forms & Sliders

When choosing the partial demo data import, the new content will be added to your existing data. Although this will not overwrite your existing content, we still recommend backing up your website before doing this.

How to Demo Import by Manual?

Step-1

Theme Installation: Admin Dashboard –>> Appearance –>> Themes –>> Just activate our theme.
Theme Name: apinae
Plugin Installation: Admin Dashboard –>> apinae –>> Theme Plugins –>> Install and Activate All required plugins.
Plugins –>> Add New –>> Plugin name is “Widget Importer and Exporter” have to install and activate this plugin. https://wordpress.org/plugins/widget-importer-exporter/
Manual Import Files: All files you get from Envato market, click and download like the below image.
  • 1. theme.xml
  • 2. widgets.wie
  • 3. theme-options.json
  • 4. custom-sidebars.json

Step-2

Theme Options Import:

Just open theme-options.json file and copy text and paste to
WP Dashboard > Apinae > Theme options > Import/Export > Import > paste > Click import. Save theme options.

Step-3

XML Import:

Ready to all import files.
In admin dashboard You can find Tools > import > WordPress > Run importer > Choose upload theme.xml file and to import.


  • 1. Import author: technology (technology).
  • 2. Import author: zozothemes (zozo_newser_user).

After, here you can choose your username and both are same.
All are must have like the below images.
Click the Submit button.

Step-4

Create Custom Sidebars:
You can edit the custom-sidebars.json file with any text editors( ex: notepad, notepad++ and sublime editors).
Admin Dashboard –>> Apinae –>> Custom Sidebars –>> Add Sidebar( Here you can create your custom sidebars).
You can create one after another.

Follow the below images:

Widgets Import:
For widget import plugin:
In admin dashboard You can find Tools > Widget Importer and Exporter Settings >> Import Widgets and Choose file with (.wie format) and import your widgets.
Now files are imported, you need to set up some settings by manual(menus and front page).
Menus Settings:
Step1: Select a menu to edit: “Primary Menu”.

In admin dashboard >> Appearance >> Menus >> You must select the “Primary Menu” like the below image.

Choose Your Front Page:

In admin dashboard >> Settings >> Reading >> Reading Settings >> A static page (select below) >> Home Page (Select your home page).

Custom Fonts

  • WP Dashboard >> Apinae >> Custom Fonts
  • Choose File & Upload your Font
  • Custom fonts should be in this following format. .eot, .otf, .svg, .ttf, .wof.
  • The folder name and font name are should be the same. but the font name should be like a slug.
  • Eg: Font folder name is – 28 Days Later font name like 28-days-later.eot, 28-days-later.otf …

Theme Update

You can update the theme in two ways are following

Update Option 1. Update using WordPress uploader

  1. Log into your ThemeForest account and navigate to Downloads tab. Find the theme and download Installable WordPress file only.
  2. Log into your WordPress website and go to Appearance > Themes.
  3. Activate a default WordPress theme. Delete the older version of your theme and re-upload the new WordPress Installable files that you have downloaded from ThemeForest during the 1st step.
  4. Once it is uploaded, activate the theme.

    IMPORTANT! If you're using a child theme, do not activate the newly uploaded parent theme. Activate your old child theme instead. Otherwise, all the child theme customizations will be lost.
  5. Update (if necessary!) the included plug-ins, if you see a notification message prompting about a newer version.
    • Navigate to WP Dashboard > Plugins > Installed Plugins.
    • Deactivate and delete the rest plug-in(s) of old version.
    • Go to (apinae)WordPress Dashboard > Plugins and demo and install the plug-in(s) like it was described in the Plugins Installation section of this documentation.

Update Option 2. Update using FTP client

  1. Log into your ThemeForest account and get the last version of the theme as described above.
  2. Connect to your server using desktop client software (we recommend Filezilla and FlashFXP.
  3. Change directory to /wp-content/themes.
  4. Remove/rename existing folder with old theme files.
  5. Unpack theme installable files downloaded from ThemeForest and upload them to the themes folder.
  6. Update (if necessary!) the included plug-ins in the way described above, if you see a notification message prompting about a newer version.

Theme Option

General

Our Theme has an advanced Theme Options Settings that control the appearance and behavior of the whole website. WP dashboard > Apinae > Theme Options. Each option has a description of what it will do on the front end. You can navigate through each tab to see what we offer.See below for screenshots and short descriptions of our Theme Options panel.

After the changes made you have to click on Save Settings button at the top of the Theme Options.


Site Settings

Loader Settings

  • Page Loader - Enable/Disable page loader, here you can upload your page loader image.

Layout Settings:

Here you can choose the Body layout style and View.

  • Site Layout - Choose site layout either wide or boxed.
  • Site Max Width - Set the site width here. Here No need to specify units like px, em, etc.. Example 1200
  • Site Content Padding - Set the top/right/bottom/left padding of page content. Here No need to specify units like px, em, etc.. Example 10 10 10 10

API:

This is the setting for all the api's where used in this site.

  • Mailchimp API Key - Place here your registered mailchimp API key.

RTL:

This is the setting for theme view RTL

  • RTL Enable/Disable - Enable/Disable RTL to change theme right to left view.
  • Enable Dark/Light - This is dark or light floating button option. You can enable or disable.

Typography

Site Typo

  • Site Common Fonts - Here you can choose entire site's body font and its style
  • Lead Text Fonts - This typography setting for Lead text.

Heading Typo

This is the setting for theme heading typography

  • H1 to H6 - This is the setting for theme H1 to h6 typography here you can choose font family, color , size line height etc. This Heading style will apply for All heading text in the site.
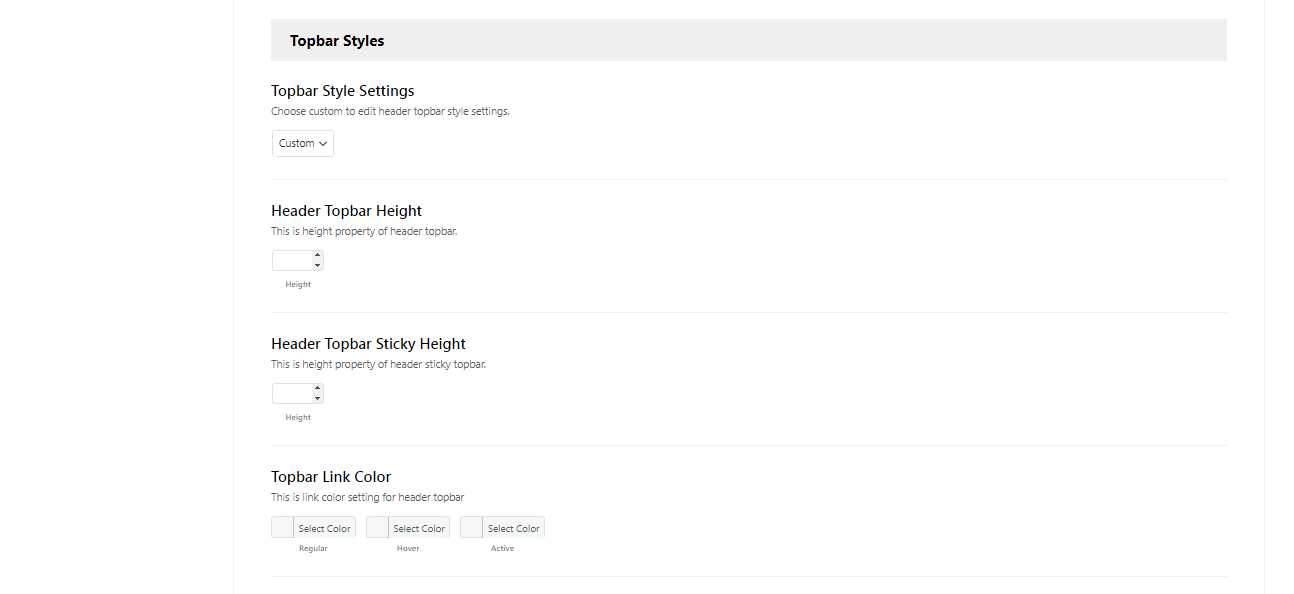
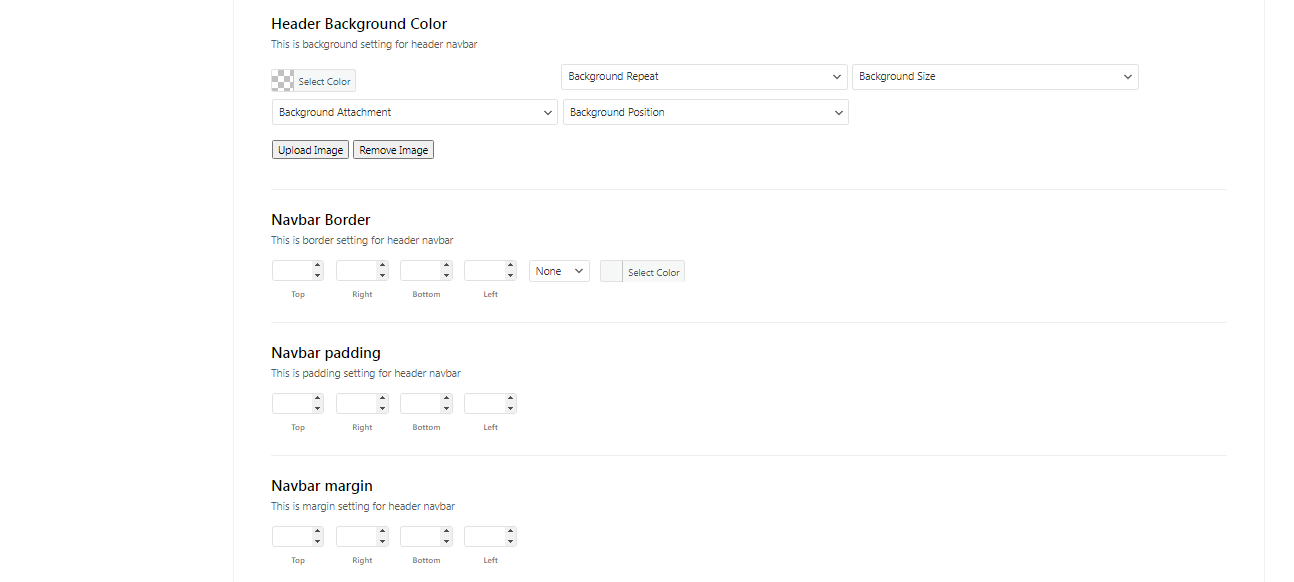
Header Typo

This is the setting for theme Header typography

  • Header Typography - Here you can choose entire header's typography.
  • Topbar Typography - This typography settings for Topbar.
  • Logo bar Typography - This typography settings for Logo bar.
  • Navbar Typography - This typography settings for Navbar.

Footer Typo

This is the setting for theme Footer typography

  • Footer Typography - Here you can choose entire Footer's typography.
  • Insta Footer Typography - This typography settings for Footer Top bar.
  • Footer Widgets Typography - Here you can select the Footer Middle's typography.
  • Copyright Section Typography - This typography settings for Footer Bottom.

Colors

Theme Colors

  • Theme Primary Color - Here you can choose theme color.
  • Theme Secondary Color - Here you can choose theme Secondary color.
  • Theme Link Color - Here you can set link color and link hover, active colors.
  • Button Color - Here you can set button's color and button's hover, active colors.

Header

Settings of this group allow you to manage an overall look and behaviour of the header elements In your website.

You can set up header settings for a specific page in the Apinae page Options > Header section of that page.

General

This is the setting for general header. Here you can change all of your header behaviour like fonts , color , sizes , background , Items , Alignments etc.. Default header styles has given you can select from Layout.if you need to add custom header you can use custom header style option.

  • Header Layout- Choose header layout Wide, Wider or Boxed.
  • Header Bars- Needed items for header, drag from disabled and put enabled.
  • Header Absolute- Enable/Disable header absolute option to show transparent header for page.
  • Choose Header Sticky- This is option to sticky header on while scroll or on while scrollup
  • Main Menu Type- This is option for enable main menu as megamenu.
Header Styles
  • Header Link Color- This is link color setting for header
  • Header Background Color- This is the settings for header background with image, color, etc.
  • Header Border- This is border setting for header.
  • Header padding- This is padding setting for header
  • Header margin- This is margin setting for header
Dropdown Menu Styles
  • Dropdown Menu Link Color- This is link color setting for menu dropdown
  • BDropdown Menu Background Color- This is background setting for sub menu.
Dropdown Menu Styles on Sticky
  • Dropdown Menu Link Color on Sticky- This is link color setting for menu dropdown on sticky.
  • Dropdown Menu Background Color on Sticky- This is background setting for menu dropdown on sticky
Other settings
  • Header Email- This is header email field. Here you can place shortcodes too.
  • Header Address- This is header address field. Here you can place shortcodes too.
  • Search Toggle Modal- Here you can choose search box type

Topbar

This is the setting for Header top bar. Here you can change all of your header Top bar behaviors like fonts , color , sizes , background , Items , Alignments etc..

  • Topbar Custom Text 1 & 2- Custom text shows header topbar. Here, you can place shortcode.
  • Top Bar Items- Needed header topbar items drag from disabled and put enabled.
Topbar Styles
  • Header Topbar Height- Increase or decrease header topbar height.
  • Header Topbar Sticky Height- Increase or decrease header topbar sticky height.
  • Topbar Link Color- This is link color setting for header topbar
  • Topbar Background Settings- This is background setting for header topbar
  • Topbar Border- This is border setting for header topbar
  • Topbar Typography- Select Topbar's typography and its style here.
  • Topbar padding- Here no need to put dimension units like px, em etc. Example 10 10 20 10.
  • Topbar Margin- This is margin setting for header topbar. Here no need to put dimension units like px, em etc. Example 10 10 20 10.
Topbar Sticky Styles
  • Topbar Sticky Link Color- This is link color setting for header topbar on sticky.
  • Topbar Sticky Background Color- This is background setting for header topbar on sticky

Logo Bar

This is the setting for Header Logo bar. Here you can change all of your header Logo bar behaviors like fonts, color, sizes, background, Items, Alignments etc..

Layout
  • Logobar Custom Text 1 & 2- This is Logobar's custom text fields. Here you can place shortcodes too.
  • Logo bar Items- These all are logobar items. You can make your own layout by drag and drop.
Logo bar Styles
  • Header Logo bar Height- Increase or decrease header Logo Section height. Here no need to put dimension units like px, em etc. Example 50.
  • Logo bar Typography- Add Logo bar's typography and its style here.
  • Logo bar Link Color- This is link color setting for header logobar.
  • Header Background Color- This is background setting for header logobar.
  • Logo bar Border- Here you can set border. No need to put dimension units like px, em etc. Example 10 10 20 10.
  • Logo bar padding- Here no need to put dimension units like px, em etc. Example 10 10 20 10.
  • Logo bar margin- This is margin setting for header logobar
Logobar Sticky Styles
  • Logobar Sticky Link Color- This is link color setting for header logobar on sticky.
  • Logobar Sticky Background Color- This is background setting for header logobar on sticky

Navbar

This is the setting for Header Navbar. Here you can change all of your header Navbar behaviors like fonts , color , sizes , background , Items , Alignments etc..

Layout
  • Navbar Custom Text 1 & 2- This is nav custom text fields. Here you can place shortcodes too.
  • Nav bar Items- These all are navbar items. You can make your own layout by drag and drop.
Navbar Styles
  • Header Navbar Height- Increase or decrease header Navbar height. Here no need to put dimension units like px, em etc. Example 50.
  • Navbar Typography- Add Navbar's typography and its style here.
  • Navbar Link Color- This is link color setting for header Navbar.
  • Header Background Color- This is background setting for header Navbar.
  • Navbar Border- Here you can set border for Navbar. No need to put dimension units like px, em etc. Example 10 10 20 10.
  • Navbar bar padding- Here no need to put dimension units like px, em etc. Example 10 10 20 10.
  • Navbar margin- This is margin setting for header Navbar
Navbar Sticky Styles
  • Navbar Sticky Link Color- This is link color setting for header Navbar on sticky.
  • Navbar Sticky Background Color- This is background setting for header Navbar on sticky

Mobile Header

This is the setting for mobile header and mobile menu. Here you can change all of your header mobile Menu behaviours like fonts , color , sizes , background , Items , Alignmets etc..

  • Mobile Bar From- This is mobile bar show option from which window width. Example 767
  • Choose Mobile Bar Sticky- This is option to sticky mobile bar on or off or on while scrollup
  • Mobile Header Items- These all are mobile header items. You can make your own layout by drag and drop
  • Mobile Menu Part Items- These all are mobile menu part items. You can make your own layout by drag and drop

Secondary Area

  • Secondary Widgets Area- Choose widget for secondary widget area. This part only works when you active secondary bar item on nav/logo bars.
  • Animation From- Choose secondary bar animation from.
  • Secondary Sidebar Width- This is maximum width of secondary sidebar. Example 300

Templates

Blog Posts

This is settings for blog page title.

  • Enable/Disable Page Title- Enable or disable blog page title section
  • Blog Page Title Elements- These are blog page title elements. Drag which items you want to display left, center and right part.
  • Blog Page Title- Enter Blog page title here.
  • Blog Page Description- This is color settings of blog page title.
  • Blog Page Title Color- This option for adding Blog page description.
  • Blog Description Color- This is color settings of blog page description.
  • Blog Title Link Color- This is link color setting for blog page title links. Like breadcrumbs color.
  • Blog Title Padding- This is padding for common blog title. Example 10 for all side.
  • Blog Page Title Background- This is background settings of blog page title.
Blog Page Layout Settings
  • Blog Sidebar Layout- Choose blog sidebar layout here.
  • Blog Right Widgets Area- Choose widget for blog right widget area.
  • Enable/Disable Top Meta- Enable or disable blog post top meta
  • Blog Post Top Meta Elements- These are blog post top meta elements. Drag which items you want to display left, center and right part.
  • Enable/Disable Bottom Meta- Enable or disable blog post bottom meta.
  • Blog Post Bottom Meta Elements- These are blog post bottom meta elements. Drag which items you want to display left, center and right part.
  • Excerpt Length- Enter excerpt length of blog post. Leave this empty to set wp default excerpt length of posts.

Posts Archive

This is settings for archive page title.

  • Enable/Disable Page Title- Enable or disable archive page title section
  • Archive Page Title Elements- These are archive page title elements. Drag which items you want to display left, center and right part.
  • Archive Page Title Color- Enter Archive page title here.
  • Archive Description Color- This is color settings of archive page description.
  • Archive Page link Color- This is link color setting for archive page title links. Like breadcrumbs color.
  • Archive Title Padding- This is padding for common Archive title. Example 10 for all side.
  • Archive Page Title Background- This is background settings of Archive page title.
Archive Page Layout Settings
  • Archive Sidebar Layout- Choose archive sidebar layout.
  • Archive Right Widgets Area- Choose widget for archive right widget area.
  • Enable/Disable Top Meta- Enable or disable archive post top meta
  • Archive Post Top Meta Elements- These are Archive Post top meta elements. Drag which items you want to display left, center and right part.
  • Enable/Disable Bottom Meta- Enable or disable blog post bottom meta.
  • Archive Post Bottom Meta Elements- These are archive post bottom meta elements. Drag which items you want to display left, center and right part.

Post Single

This is settings for single post page title.

Single Post Page Title Settings
  • Enable/Disabe Page Title- Enable or disable single post page title section
  • Single Post Page Title Elements- These are Single Post Page title elements. Drag which items you want to display left, center and right part.
  • Single Post Page Title Color- EnterSingle Post Page title here.
  • Single Post Page Description Color- This is color settings of Single Post Page description.
  • Single Post Page link Color- This is link color setting for Single Post Page title links. Like breadcrumbs color.
  • Single Post Page Title Padding- This is padding for common Single Post Page title. Example 10 for all side.
  • Single Post Page Title Background- This is background settings of Single Post Page title.
Single Post Layout Settings
  • Single Post Sidebar Layout- Choose Single Post sidebar layout.
  • Single Post Right Widgets Area- Choose widget for Single Post right widget area.
  • Enable/Disable Top Meta- Enable or disable Single post top meta
  • Single Post Top Meta Elements- These are Single Post top meta elements. Drag which items you want to display left, center and right part.
  • Enable/Disable Bottom Meta- Enable or disable Single Post bottom meta.
  • Single Post Bottom Meta Elements- These are Single Post bottom meta elements. Drag which items you want to display left, center and right part.

Page

This is settings for single page title.

Page Title Settings
  • Enable/Disabe Page Title- Enable or disable page title section.
  • Page Title Elements- These are page title elements. Drag which items you want to display left, center and right part.
  • Page Title Color- This is color settings of page title.
  • Page Title Description Color- This is color settings of page description.
  • Page Title Link Color- This is link color setting for page title links. Like breadcrumbs color.
  • Page Title Padding- This is padding for common page title. Example 10 for all side.
  • Page Title Background- This is background settings of page title.
Page Layout Settings
  • Single Page Sidebar Layout- Choose sidebar for the Single page here.

Custom Posts Archive

This is settings for custom archive page title.

  • Enable/Disabe Page Title- Enable or disable Custom archive page title section
  • Custom archive page Title Elements- These are Custom archive page title elements. Drag which items you want to display left, center and right part.
  • Custom archive page Title Color- Enter Custom archive page title here.
  • Custom archive page Description Color- This is color settings of Single Post Page description.
  • Custom archive page Title link Color- This is link color setting for Custom archive page title links. Like breadcrumbs color.
  • Custom archive page Title Padding- This is padding for common Custom archive page title. Example 10 for all side.
  • Custom archive page Title Background- This is background settings of Custom archive page title.
Custom Archive Page Layout Settings
  • Archive Sidebar Layout- Choose archive sidebar layout.
  • Right Widgets Area- Choose widget for custom archive right widget area.

Custom Post Single

This is settings for Custom Post Single page title.

  • Enable/Disabe Page Title- Enable or disable Custom Post Single page title section
  • Custom Post Single page Title Elements- These are Custom Post Single page title elements. Drag which items you want to display left, center and right part.
  • Custom Post Single page Title Color- Enter Custom Post Single page title here.
  • Custom Post Single page Description Color- This is color settings of Custom Post Single pagedescription.
  • Custom Post Single page Title link Color- This is link color setting for Custom Post Single page title links. Like breadcrumbs color.
  • Custom Post Single page Title Padding- This is padding for common Custom Post Single page title. Example 10 for all side.
  • Custom Post Single page Title Background- This is background settings of Custom Post Single page title.
Custom Single Post Page Layout Settings
  • Custom Single Post Sidebar Layout- Choose Custom Post Single page sidebar layout.
  • Right Widgets Area- Choose widget for Custom Post Single page right widget area.

CEA Templates

CEA Service Page Title Settings

  • Enable/Disabe Page Title- Enable or disable CEA service title section
  • CEA Service Page Title Elements- These are CEA service page title elements. Drag which items you want to display left, center and right part.
  • CEA Service Title Color- This is color settings of CEA service title.
  • CEA Service Title Description Color- This is color settings of CEA service description.
  • CEA Service Title Link Color- This is link color setting for CEA service title links. Like breadcrumbs color.
  • Custom Single Title Padding- This is padding for common CEA service title. Example 10 for all side.
  • CEA Service Page Title Background- This is background settings of CEA service title.
CEA Service Page Layout Settings
  • CEA Service Sidebar Layout- Choose CEA service sidebar layout.

CEA Team Page Title Settings

  • Enable/Disabe Page Title- Enable or disable CEA team page title section
  • CEA Team Page Title Elements- These are CEA team page title elements. Drag which items you want to display left, center and right part.
  • CEA Team Title Color- This is color settings of CEA team title.
  • CEA Team Title Description Color- This is color settings of CEA team page description.
  • CEA Team Title Link Color- This is link color setting for CEA team page title links. Like breadcrumbs color.
  • Custom Single Title Padding- This is padding for common CEA team title. Example 10 for all side
  • CEA Team Page Title Background- This is background settings of CEA team page title.
CEA Team Page Layout Settings
  • CEA Team Sidebar Layout- Choose archive sidebar layout.
  • Right Widgets Area- Choose widget for CEA team right widget area.

CEA Testimonial Page Title Settings

  • Enable/Disabe Page Title- Enable or disable CEA Testimonial page title section
  • CEA Testimonial Page Title Elements- These are CEA Testimonial page title elements. Drag which items you want to display left, center and right part.
  • CEA Testimonial Title Color- This is color settings of CEA Testimonial title.
  • CEA Testimonial Title Description Color- This is color settings of CEA Testimonial page description.
  • CEA Testimonial Title Link Color- This is link color setting for CEA Testimonial page title links. Like breadcrumbs color.
  • Custom Single Title Padding- This is padding for common CEA Testimonial title. Example 10 for all side
  • CEA Testimonial Page Title Background- This is background settings of CEA Testimonial page title.
CEA Testimonial Page Layout Settings
  • CEA Testimonial Sidebar Layout- Choose archive sidebar layout.
  • Right Widgets Area- Choose widget for CEA Testimonial right widget area.

CEA Portfolio Page Title Settings

  • Enable/Disabe Page Title- Enable or disable CEA Portfolio page title section
  • CEA Portfolio Page Title Elements- These are CEA Portfolio page title elements. Drag which items you want to display left, center and right part.
  • CEA Portfolio Title Color- This is color settings of CEA Portfolio title.
  • CEA Portfolio Title Description Color- This is color settings of CEA Portfolio page description.
  • CEA Portfolio Title Link Color- This is link color setting for CEA Portfolio page title links. Like breadcrumbs color.
  • Custom Single Title Padding- This is padding for common CEA Portfolio title. Example 10 for all side
  • CEA Portfolio Page Title Background- This is background settings of CEA Portfolio page title.
CEA Portfolio Page Layout Settings
  • CEA Portfolio Sidebar Layout- Choose archive sidebar layout.
  • Right Widgets Area- Choose widget for CEA Portfolio right widget area.

CEA Event Page Title Settings

  • Enable/Disabe Page Title- Enable or disable CEA Event page title section
  • CEA Event Page Title Elements- These are CEA Event page title elements. Drag which items you want to display left, center and right part.
  • CEA Event Title Color- This is color settings of CEA Event title.
  • CEA Event Title Description Color- This is color settings of CEA Event page description.
  • CEA Event Title Link Color- This is link color setting for CEA Event page title links. Like breadcrumbs color.
  • Custom Single Title Padding- This is padding for common CEA Event title. Example 10 for all side
  • CEA Event Page Title Background- This is background settings of CEA Event page title.
CEA Event Page Layout Settings
  • CEA Event Sidebar Layout- Choose archive sidebar layout.
  • Right Widgets Area- Choose widget for CEA Event right widget area.

Social

Social Link

You can Only Display these social links in Header , Footer , Sidebar widgets.

This is the setting for social links.

  • Social Icons Layout- Choose social icons layout normal/radius or circle layout.
  • Target Window- Select the target window open into same window or blank window.
  • Social Icons Fore- Social icons fore color settings.
  • Social Icons Fore Hover- Social icons fore hover color settings.
  • Social Icons Background- Social icons background color settings.
  • Social Icons Background Hover- Social icons background hover color settings.
  • Social Links- These are social links settings. Drag and drop needed social links to enabled part

Social Share

This is the setting for social share.

  • Social Share- These are social share links settings. Drag and drop needed social share to enabled part

Woocommerce

Shop

  • Enable/Disabe Shop Page Title- Enable or disable shop page title section
  • Shop Page Title Elements- These are shop page title elements. Drag which items you want to display left, center and right part.
  • Shop Page Title Color- This is color settings of shop page title.
  • Shop Page Title Description Color- This is color settings of shop page description.
  • Shop Page Title Link Color- This is link color setting for shop page title links. Like breadcrumbs color.
  • Shop Page Title Padding- This is padding for shop page title. Example 10 for all side
  • Shop Page Title Background- This is background settings of page title.
Shop Page Layout Settings
  • Shop Single Post Sidebar Layout- Choose shop page sidebar layout.
  • Shop Page Right Widgets Area- Choose widget for shop page right widget area.

Product

  • Enable/Disabe Product Page Title- Enable or disable product page title section
  • Product Page Title Elements- These are product page title elements. Drag which items you want to display left, center and right part.
  • Product Page Title Color- This is color settings of product page title.
  • Product Page Title Description Color- This is color settings of product page description.
  • Product Page Title Link Color- This is link color setting for product page title links. Like breadcrumbs color.
  • Product Page Title Padding- This is padding for product page title. Example 10 for all side.
  • Product Page Title Background- This is background settings of page title.
Product Page Layout Settings
  • Product Single Post Sidebar Layout- Choose product page sidebar layout.
  • Product Page Right Widgets Area- Choose widget for product page right widget area.

Maintenance

This is the general setting for maintenance of current site.

  • Maintenance Mode Option- Enable/Disable maintenance mode.
  • Maintenance Type- Here you can choose Maintenance Type.
  • Phone- Enter phone number shown on when maintenance mode actived.
  • Email- Enter email id shown on when maintenance mode actived.
  • Address- Place here your address and info.

Maintenance Mode If you enabled Maintenance Mode means only admin can view the site.

Import and Export

Import

  • Import- Paste theme options.json file here and press import button and wait untill process complete.

Export

  • Export- Get your theme option.json file by click export button. Once click export button wait few seconds to get.

Page and Post Options

The Page options is used to change A particular page Settings. Here you can change header , Footer Styles , Page Templates. Sidebars, Page padding , spacing , page layout etc.

This Option will work on only that page. So for Global change you should use Theme options. WordPress Dashboard >> Apinae >> Theme options. If you want to change the style of any particular page/post, you can use the page/post options.


Page options

This is Page Options here you can modify this page Layouts and looks this all settings will only work for this particular Page.

General

This is general page settings like layouts , Skins etc and this all settings will only work for this particular Page.

  • Site General Settings : Choose Custom option to change this Current page style.
  • Site Layout : Choose current page layout either wide or boxed.
  • Content Padding : Assign content padding. If need no padding means just leave this empty. Example 10 10 10 10.
  • Header Slider : Paste the shortcode for header slider.

Logo Settings

This is Logo page settings like layouts , Skins etc and this all settings will only work for this particular Page.

  • Site General Settings : Choose Custom option to change this Current page's Logo settings.
  • Logo Settings
  • Default Logo : Upload current page logo image..
  • Site Logo Maximum Width : Here you can choose maximum width of logo. if you want original width leave this field empty.
  • Enable Site Logo Description : This is logo description options for this site. You can enable or disable.
  • Sticky Logo : Choose site sticky logo image of current page.
  • Sticky Logo Maximum Width : This is maximum width of sticky logo. if you want original width leave this field empty.
  • Mobile Logo : Choose Current Page's mobile logo image.
  • Mobile Logo Maximum Width : This is maximum width of mobile logo. if you want original width leave this field empty.

Header Settings

General

This is page Header settings like Header layouts , Skins etc and this all settings will only work for this particular Page.

  • Header Settings : Choose Custom option to change this Current page header style.
  • Header Layout : Choose current page header layout either wide or boxed.
  • Header Bars : These are header items. Drag which items you want to display normal and sticky.
  • Header Absolute : Enable/Disable header absolute. Like floating on slider.
  • Search Toggle Modal : Slect search box type.
Styles
  • Header Style Settings : Choose Custom to edit header style settings options..
  • Header Link Color : This is link color setting for header
  • Header Background Color : This is background setting for header
  • Header Border : This is border setting for header
  • Header padding : This is padding setting for header
  • Header margin : This is margin setting for header.

Topbar

This is page Header Topbar settings like Header layouts , Skins etc and this all settings will only work for this particular Page.

  • Header Topbar Settings : Choose Custom option to change this Current page topbar style.
  • Topbar Custom Text 1 : This is topbar custom text field 1. Here you can place shortcodes too.
  • Topbar Custom Text 2 : This is topbar custom text field 1. Here you can place shortcodes too.
  • Topbar Items : These all are topbar items. You can make your own layout by drag and drop.
Topbar Styles
  • Topbar Style Settings : Choose custom to edit header topbar style settings.
  • Header Topbar Height : This is height property of header topbar.
  • Header Topbar Sticky Height : This is height property of header sticky topbar.
  • Topbar Link Color : This is link color setting for header topbar
  • Topbar Background Color : This is background setting for header topbar
  • Topbar Border : This is border setting for topbar
  • Topbar padding : This is padding setting for topbar
  • Topbar margin : This is margin setting for topbar.
Topbar Sticky Styles
  • Topbar Sticky Link Color : This is link color setting for header topbar on sticky
  • Topbar Sticky Background Color : This is background setting for header topbar on sticky

Logobar

This is page Header logobar settings like Header layouts , Skins etc and this all settings will only work for this particular Page.

  • Header Logo bar Settings : Choose Custom option to change this Current page Logo bar style.
  • Logo bar Custom Text 1 : This is Logo bar custom text field 1. Here you can place shortcodes too.
  • Logo bar Custom Text 2 : This is Logo bar custom text field 1. Here you can place shortcodes too.
  • Logo bar Items : These all are Logo bar items. You can make your own layout by drag and drop.
Logo bar Styles
  • Logo bar Style Settings : Choose custom to edit header Logo bar style settings.
  • Header Logo bar Height : This is height property of header Logo bar.
  • Header Logo bar Sticky Height : This is height property of header sticky Logo bar.
  • Logo bar Link Color : This is link color setting for header Logo bar
  • Logo bar Background Color : This is background setting for header Logo bar
  • Logo bar Border : This is border setting for Logo bar
  • Logo bar padding : This is padding setting for Logo bar
  • Logo bar margin : This is margin setting for Logo bar.
Logo bar Sticky Styles
  • Logo bar Sticky Link Color : This is link color setting for header Logo bar on sticky
  • Logo bar Sticky Background Color : This is background setting for header Logo bar on sticky

Navbar

This is page Header Navbar settings like Header layouts , Skins etc and this all settings will only work for this particular Page.

  • Header Navbar Settings : Choose Custom option to change this Current page Navbar style.
  • Navbar Custom Text 1 : This is Navbar custom text field 1. Here you can place shortcodes too.
  • Navbar Custom Text 2 : This is Navbar custom text field 1. Here you can place shortcodes too.
  • Navbar Items : These all are Navbar items. You can make your own layout by drag and drop.
Navbar Styles
  • Navbar Style Settings : Choose custom to edit header Navbar style settings.
  • Header Navbar Height : This is height property of header Navbar.
  • Header Navbar Sticky Height : This is height property of header sticky Navbar.
  • Navbar Link Color : This is link color setting for header Navbar
  • Navbar Background Color : This is background setting for header Navbar
  • Navbar Border : This is border setting for Navbar
  • Navbar padding : This is padding setting for Navbar
  • Navbar margin : This is margin setting for Navbar.
Navbar Sticky Styles
  • Navbar Sticky Link Color : This is link color setting for header Navbar on sticky
  • Navbar Sticky Background Color : This is background setting for header Navbar on sticky

Page Layout

Page Title

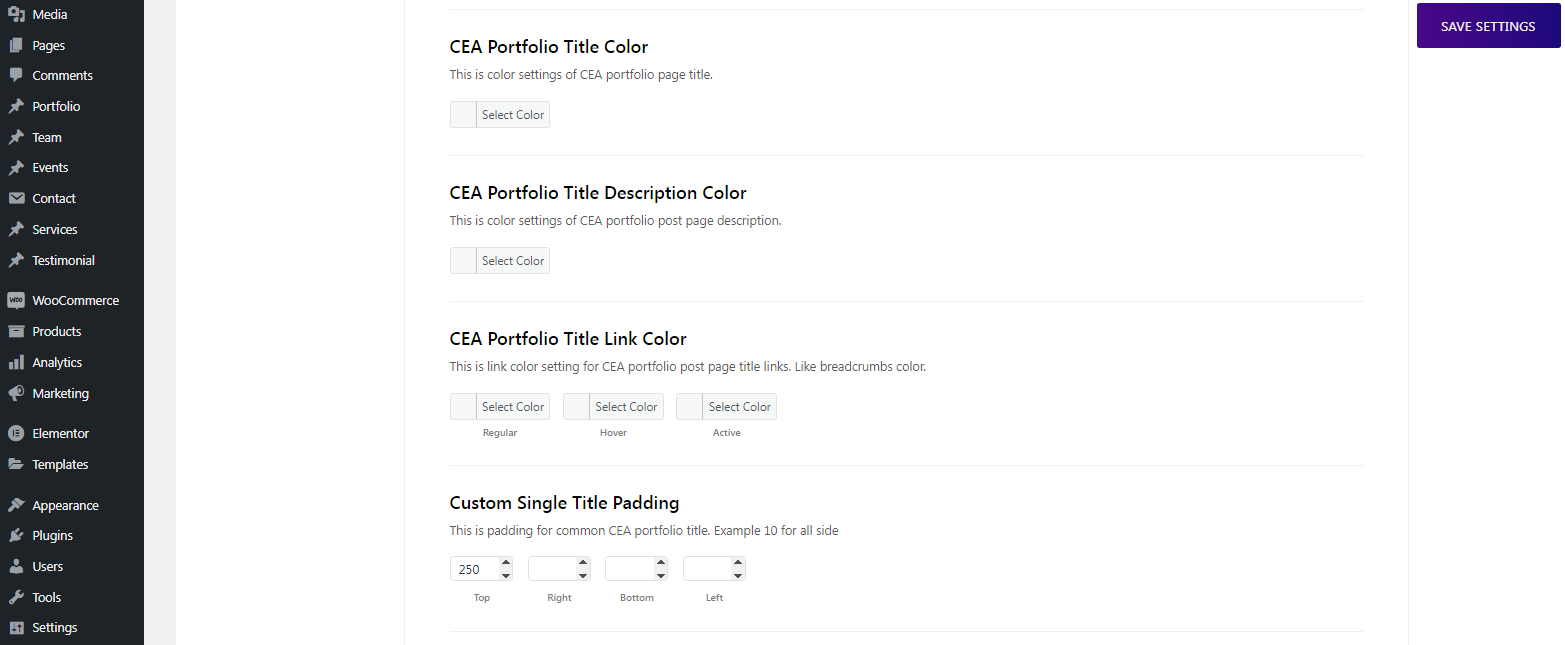
  • Page Title : Choose custom to edit page title options.
  • Enable/Disabe Page Title : Enable or disable blog page title section.
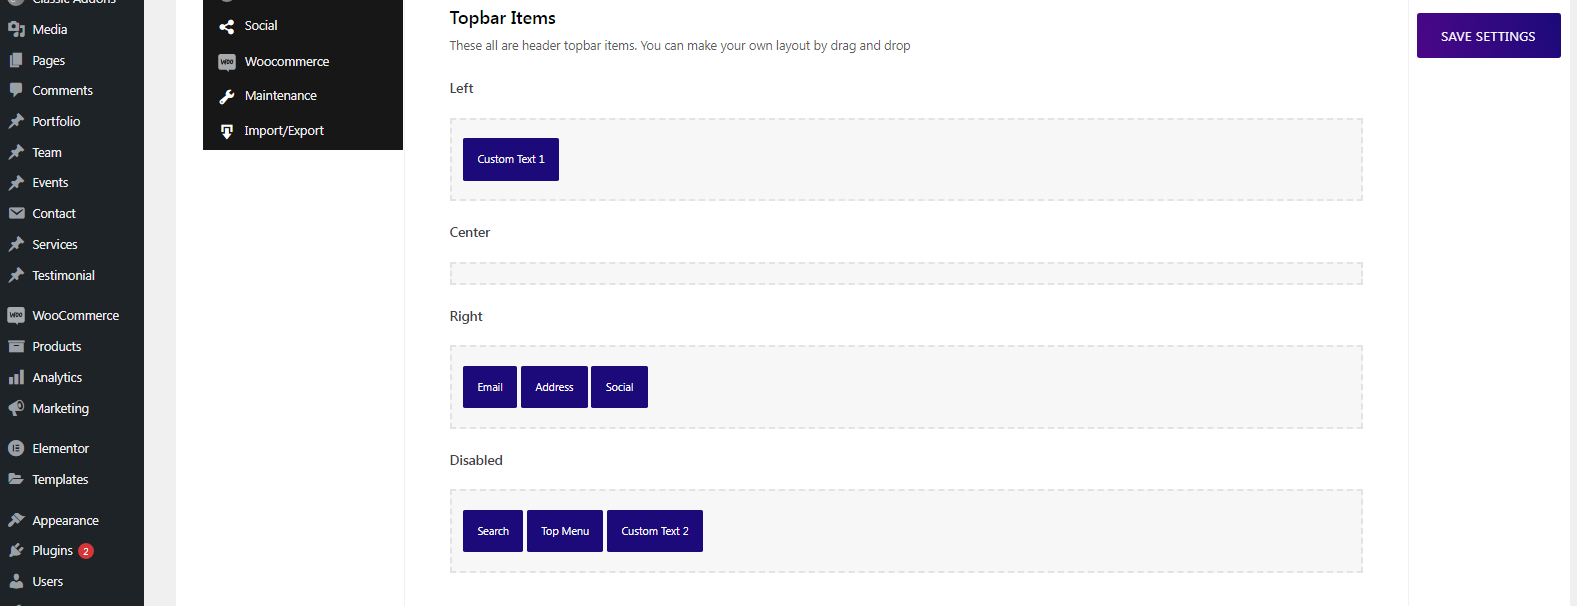
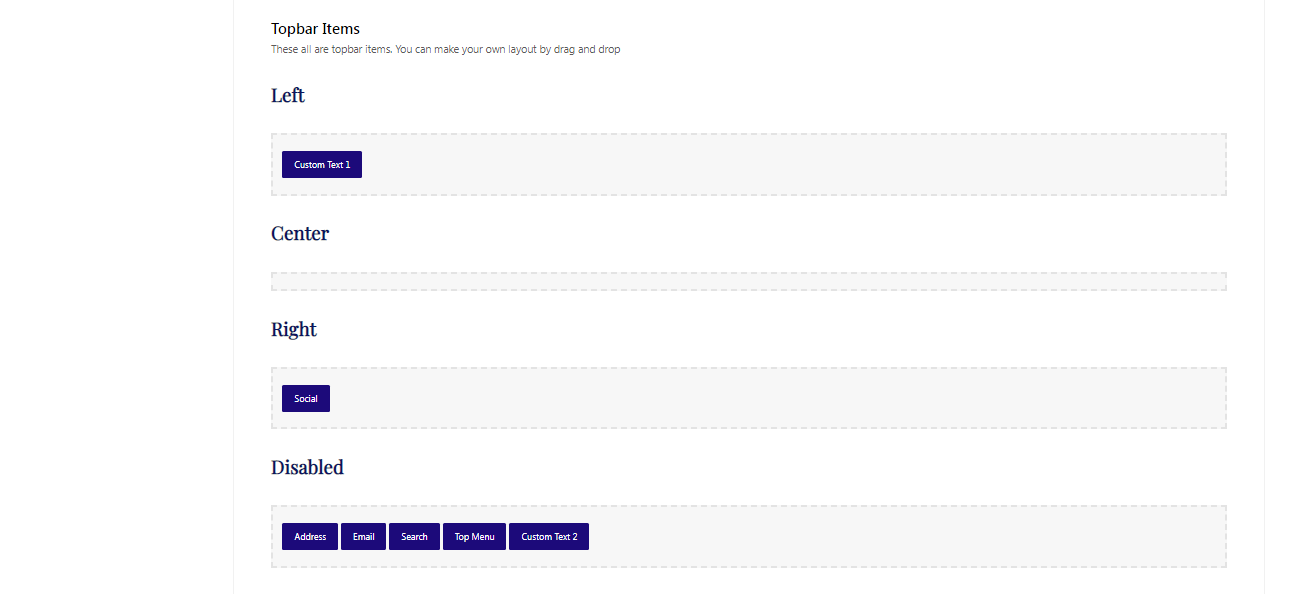
  • Blog Page Title Elements : These are blog page title elements. Drag which items you want to display left, center and right part.
  • Page Title Background : This is background settings of page title.
  • Page Title Custom Class : This is setting for add custom class name to page title wrapper.

Sidebar Layout

  • Sidebar : Choose custom to edit sidebar layout options.
  • Sidebar Layout : Here you can Choose sidebar layout.
  • Right Widgets Area : Choose widget for right widget area.
 

Post options

This is Post Options here you can modify this Post Layouts and looks this all settings will only work for this particular Post.

General

This is general Post settings like layouts , Skins etc and this all settings will only work for this particular Post.

  • Site General Settings : Choose Custom option to change this Current Post style.
  • Site Layout : Choose current Post layout either wide or boxed.
  • Content Padding : Assign content padding. If need no padding means just leave this empty. Example 10 10 10 10.
  • Header Slider : Paste the shortcode for header slider.

Logo Settings

This is general Post settings like layouts , Skins etc and this all settings will only work for this particular Post.

  • Site General Settings : Choose Custom option to change this Current Post's Logo settings.
  • Logo Settings
  • Default Logo : Upload current Post logo image..
  • Site Logo Maximum Width : Here you can choose maximum width of logo. if you want original width leave this field empty.
  • Enable Site Logo Description : This is logo description options for this site. You can enable or disable.
  • Sticky Logo : Choose site sticky logo image of current Post.
  • Sticky Logo Maximum Width : This is maximum width of sticky logo. if you want original width leave this field empty.
  • Mobile Logo : Choose Current Post's mobile logo image.
  • Mobile Logo Maximum Width : This is maximum width of mobile logo. if you want original width leave this field empty.

Header Settings

General

This is Post Header settings like Header layouts , Skins etc and this all settings will only work for this particular Post.

  • Header Settings : Choose Custom option to change this Current Post header style.
  • Header Layout : Choose current Post header layout either wide or boxed.
  • Header Bars : These are header items. Drag which items you want to display normal and sticky.
  • Header Absolute : Enable/Disable header absolute. Like floating on slider.
  • Search Toggle Modal : Slect search box type.
Styles
  • Header Style Settings : Choose Custom to edit header style settings options..
  • Header Link Color : This is link color setting for header
  • Header Background Color : This is background setting for header
  • Header Border : This is border setting for header
  • Header padding : This is padding setting for header
  • Header margin : This is margin setting for header.

Topbar

This is Post Header Topbar settings like Header layouts , Skins etc and this all settings will only work for this particular Post.

  • Header Topbar Settings : Choose Custom option to change this Current Post topbar style.
  • Topbar Custom Text 1 : This is topbar custom text field 1. Here you can place shortcodes too.
  • Topbar Custom Text 2 : This is topbar custom text field 1. Here you can place shortcodes too.
  • Topbar Items : These all are topbar items. You can make your own layout by drag and drop.
Topbar Styles
  • Topbar Style Settings : Choose custom to edit header topbar style settings.
  • Header Topbar Height : This is height property of header topbar.
  • Header Topbar Sticky Height : This is height property of header sticky topbar.
  • Topbar Link Color : This is link color setting for header topbar
  • Topbar Background Color : This is background setting for header topbar
  • Topbar Border : This is border setting for topbar
  • Topbar padding : This is padding setting for topbar
  • Topbar margin : This is margin setting for topbar.
Topbar Sticky Styles
  • Topbar Sticky Link Color : This is link color setting for header topbar on sticky
  • Topbar Sticky Background Color : This is background setting for header topbar on sticky

Logobar

This is Post Header logobar settings like Header layouts , Skins etc and this all settings will only work for this particular Post.

  • Header Logo bar Settings : Choose Custom option to change this Current Post Logo bar style.
  • Logo bar Custom Text 1 : This is Logo bar custom text field 1. Here you can place shortcodes too.
  • Logo bar Custom Text 2 : This is Logo bar custom text field 1. Here you can place shortcodes too.
  • Logo bar Items : These all are Logo bar items. You can make your own layout by drag and drop.
Logo bar Styles
  • Logo bar Style Settings : Choose custom to edit header Logo bar style settings.
  • Header Logo bar Height : This is height property of header Logo bar.
  • Header Logo bar Sticky Height : This is height property of header sticky Logo bar.
  • Logo bar Link Color : This is link color setting for header Logo bar
  • Logo bar Background Color : This is background setting for header Logo bar
  • Logo bar Border : This is border setting for Logo bar
  • Logo bar padding : This is padding setting for Logo bar
  • Logo bar margin : This is margin setting for Logo bar.
Logo bar Sticky Styles
  • Logo bar Sticky Link Color : This is link color setting for header Logo bar on sticky
  • Logo bar Sticky Background Color : This is background setting for header Logo bar on sticky

Navbar

This is Post Header Navbar settings like Header layouts , Skins etc and this all settings will only work for this particular Post.

  • Header Navbar Settings : Choose Custom option to change this Current Post Navbar style.
  • Navbar Custom Text 1 : This is Navbar custom text field 1. Here you can place shortcodes too.
  • Navbar Custom Text 2 : This is Navbar custom text field 1. Here you can place shortcodes too.
  • Navbar Items : These all are Navbar items. You can make your own layout by drag and drop.
Navbar Styles
  • Navbar Style Settings : Choose custom to edit header Navbar style settings.
  • Header Navbar Height : This is height property of header Navbar.
  • Header Navbar Sticky Height : This is height property of header sticky Navbar.
  • Navbar Link Color : This is link color setting for header Navbar
  • Navbar Background Color : This is background setting for header Navbar
  • Navbar Border : This is border setting for Navbar
  • Navbar padding : This is padding setting for Navbar
  • Navbar margin : This is margin setting for Navbar.
Navbar Sticky Styles
  • Navbar Sticky Link Color : This is link color setting for header Navbar on sticky
  • Navbar Sticky Background Color : This is background setting for header Navbar on sticky

Post Layout

Page Title

  • Page Title : Choose custom to edit Page title options.
  • Enable/Disabe Page Title : Enable or disable blog Page title section.
  • Blog Page Title Elements : These are blog Page title elements. Drag which items you want to display left, center and right part.
  • Page Title Background : This is background settings of Page title.
  • Page Title Custom Class : This is setting for add custom class name to Page title wrapper.

Sidebar Layout

  • Sidebar : Choose custom to edit sidebar layout options.
  • Sidebar Layout : Here you can Choose sidebar layout.
  • Right Widgets Area : Choose widget for right widget area.

Post Footer

General

This is Post footer settings like footer layouts , Skins etc and this all settings will only work for this particular Post.

  • Footer Settings : Choose custom to edit footer settings options..
  • Footer Layout : Choose current Post Footer Layout either wide or boxed.
  • Footer Items : These are footer items. Drag which items you want to display Enabled and Disabled.

Insta Foooter

This is Post Insta footer settings like footer layouts , Skins etc and this all settings will only work for this particular Post.

  • Footer Top Settings : Choose custom to edit insta footer settings options.
  • Footer Top Layout : Choose insta footer layout either wide or boxed.

Footer Widgets

This is Post Footer Widgets settings like footer layouts , Skins etc and this all settings will only work for this particular Post.

  • Footer Widgets Settings : Choose custom to edit footer middle settings options.
  • Widgets Footer Layout : Choose widgets footer layout either wide or boxed.
  • Footer Widgets Layout : Choose footer widgets layout.
  • Footer Widgets Area 1 : Choose widget for footer widget area 1.

Copyright Section

This is Post Copyright Section settings like footer layouts , Skins etc and this all settings will only work for this particular Post.

  • Footer Widgets Settings : Choose custom to edit footer middle settings options.
  • Footer Bottom Layout : Choose footer bottom layout either wide or boxed.

Plug-ins

This section contains a brief description, as well as references, to some plug-ins available with this theme.

Contact Form 7

Contact Form 7 can manage multiple contact forms, plus you can customize the form and the mail contents flexibly with simple markup. The form supports Ajax-powered submitting, CAPTCHA, Akismet spam filtering and so on.
Check this link for more information. More guides are available here.

The theme comes with several pre-built contact forms that can be customized in Contact (WP Dashboard) > Contact Forms.


[contact-form-7 id="5" title="Contact form 1"]

PLEASE NOTE! According to General Data Protection Regulation, you need to make your forms compliant. All pre-built forms, that come with this theme, already have the corresponding "I agree..." checkboxes.

Slider Revolution

Our theme is fully compatible with an extremely powerful Revolution Slider plug-in. Your secret weapon to creating responsive WordPress sliders, web pages & stunning visuals even with zero experience.

Check the following links for more information regarding the Revolution Slider functionality:

  1. Slider usage Example and how-tos
  2. Video guide

Add Slider Revolution via Shortcodes

You can add sliders to your page using shortcodes in WPBakery Page Builder Or Page page options >> Slider >> Here you can paste you Revolution Slider Shortcode. You can either use the Revolution Slider shortcode, or select the Slider shortcode and choose slider engine - Slider Revolution.

WooCommerce

WooCommerce is the world’s most popular open-source eCommerce solution. Our core platform is free, flexible, and amplified by a global community. The freedom of open-source means you retain full ownership of your store’s content and data forever. Whether you’re launching a business, taking brick-and-mortar retail online, or developing sites for clients, use WooCommerce for a store that powerfully blends content and commerce.

Please refer Woocommerce Documenmtation. Here is a list of really reference to create your shop.

  1. Documentation - official plug-in documentation.

Elementor Page Builder

It’s about time for a live page builder, with no limits of design. A page builder that delivers high-end page designs and advanced capabilities, never before seen on WordPress.

  1. Tons Of Designs Ideas- Here you can Refer Design Ideas
  2. Elementor Faq's- Official Elementor Frequently Asked Questions
  3. Video Tutorials For Elementor Page builder- Here you can watch Tutorials Of Elementor Page builder
  4. Elementor official Documentation- This Is KnowledgeBase Of Elementor Live page builder
  5. Getting Started Guide- Official Getting Started Guide
  6. Elementor Tips and Tricks- Tips and Tricks For Elementor

Classic Elementor Addons Pro

Check out our detailed documentation of Classic Elementor Addon Pro

.

Translations

1. Get the theme 

  • In this example we're going to add some translations to our theme apinae.
  • we assume you already know how to install WordPress themes. You don't need to activate the theme yet. Just have it installed into "wp-content/themes" and we can move on.

2. Check you can switch language 

Wordpress Dashboard >> Settings > General admin screen and scroll to the bottom. You should see a drop-down list with the label "Site Language". Changing this will set a new default language for all site visitors. Try it and you should see something like this:

we're going to set the language to Greek, listed under "Available > Ελληνικά" in the list. Once WordPress has downloaded the core language packs for Greek this entry will move to the "Installed" section.

If you don't see your language in the drop-down list you may have to install the core language packs manually.


3. Set up the folders

Before you do any translating, make sure the following folder exists on your site, and is writable by the web server:

wp-content/languages/loco/themes

4. Check the theme contains a POT file

  • Looking inside the apinae theme folder we can see a "languages" sub-folder containing a file called "apinae.pot". This is a translation template provided by the theme author. It contains all the translatable phrases (or strings) that the theme defines.
  • If your theme has no template file, Loco Translate will warn you. In this case we know it exists, but just to be sure check it's at the following location:
wp-content/themes/apinae/languages/apinae.pot

5. Find the theme in the translation dashboard 

Click the admin menu item that says "Loco Translate" and select the "Themes" sub section. This will take you to a list of all available themes in your WordPress. You should see "apinae" in the list regardless of whether it's your active theme. Click it and you should see the following screen:


Skip PHP Files Larger Than Size always Should be 2000k.


6. Add a new language 

  • Above the language list (which may be empty) you should see a button that says "New language" with an add icon. To start translating the theme into another language click this button and you'll be taken to a new screen where you can choose the language you want.
  • Select a language from the drop-down list of common languages. In this example we'll select 'Greek'. You could achieve the same result by entering "el" into the text field instead

7. Translate some strings

  • Once on the editor screen you'll see all the strings the theme has defined in its template file. Untranslated strings are shown in bold blue. To start with they will all be untranslated.
  • The basics of the editor should be fairly intuitive. Select the English string at the top and enter your translation in the pane at the bottom. You can ignore most of the editor buttons for now. We're just going to enter a translation and save it.


  • For our example we've picked out the phrase "Leave a Reply". Using the text filter at the top of the editor we can find this phrase quickly and select it in the list. Then we enter the text "Αφήστε μια απάντηση" into the bottom panel as our translation.
  • The string at the top now shows a star icon to indicate that our changes are not yet saved.
  • Continue to translate as much as you like and when you're ready click the Save icon in the editor toolbar. Congratulations, you've saved your first WordPress translation.

8. Viewing the translated theme String

  • Our new MO file will be loaded by the Omega theme (and only by the apinae theme) when the Greek language setting is active. So, let's check it works..
  • blog post on your site and check near comment box the sample phrase we translated . We can see here "Leave a Reply will appear - below the title of every post.


it Will work.

  • For Our core Plugin Translate same Format like as Theme Translation.
  • Some of our Strings will display from our core Plugin.
  • So we Need to translate our Core Plugin too for language translation.

  • Wordpress Dashboard >> Loco Translate >> Plugin Here you can find Our core plug-in Example apinae Core
  • Create New language >> Select language Example (Example ) Greek we chose before for theme translation. 
  • Select path for pot generation.
  • Finally you can start translate apinae Core plugin file. 
  • This will also work like Theme string translation.

For More Questions Refer this site

https://localise.biz/wordpress/plugin/beginners

Common Faq's

Here we discussed about Common themes and its features Frequently Asked Questions.

Mailchimp API Key Issue
Please follow the below steps to fix the error. Go to admin backend > login to admin > Go to Customizer > Theme options > General > API > Mailchimp API Key. input your Mailchimp Key.
  • You can add mailchimp subscriptions to any wordpress page/post in two ways. One is Elementor Shortcodes and other one is Mailchimp Widget.
  • Before that you need to add Mailchimp api key to integrate with your mailchimp account.
  • Navigate to Theme Options > General > API > Mailchimp Api key. You can find the Mailchimp API Key box.
  • Enter your Mailchimp API key to get subscribers for your lists.
  • Add Mailchimp Using Elementor.
  • You can design your Forms using Elemenor Shortcodes. Just go to the page where you want to add mailchimp form and Click on Add New Element button in Elementor tab.
  • Navigate to Theme Addons and click on Mailchimp Form addon.
  • Mailchimp Form popup box will open and customize your details and click ok. The mailchimp form is added.
  • Add Mailchimp Using Mailchimp Widget.
  • To add mailchimp widget, Navigate to Appearance > Widgets.
  • You can find the Widget Mailchimp Subscription Form in left side of the page. Just drag and drop it in your required area.
  • Click on the Mailchimp Widget Tab and Enter the details of your Mailchimp such as Title, Description and Mailing List.
Theme options >> Custom post types >> Services >> Service Slug here you can change. Save the theme options. Also Save permalinks once In Settings >> Permalinks.
Check Woocommerce installed? You should install woocommerce before demo import so only shop page and products will import properly.
If you got slider not found Alert in slider area means please check if all the slider is available or not. If all ok means please check shortcode Pasted correctly in page options. Also Check Revolution sliders is available.
Theme options >> Custom post types >> Services >> Service Slug here you can change. Save the theme options. Also Save permalinks once In Settings >> Permalinks.
Theme options >> Custom Post Types. Here you can enable of disable your custom post types. save theme options.
Theme options >> Skin >> Theme Skin Here you can change the theme color. save theme options.
Theme options General > API Get API key fromGoogle map then paste to Google Map API Key text box. Finally Save the theme options.
  • Theme options General > Loader
  • You can see the Page Loader Just enable that  then you can upload your page loader image.
  • Finally Save the theme options
  • Theme options > custom post type Enable whatever you need
  • save theme option Refresh the page  you can find the custom post types in admin sidebar.
  • Login to wordPress Admin
  • Navigate to System status  in your left admin sidebar.
  • Here you can see your System status and configuration
  • WP Dashboard >> Apinae >> Custom Fonts
  • Choose File &Upload your Font
  • Custom fonts should be in this following format. .eot, .otf, .svg, .ttf, .wof option.
  • The folder name and font name are should be the same. but the font name should be like a slug.
  • Eg: Font folder name is – 28 Days Later font name like 28-days-later.eot, 28-days-later.otf …
  • Navigate to Revolution Slider in your admin sidebar.
  • You can find the Import Slider option.
  • Click on Browse button and select your zip file then click Import Slider button.
  • Step 1 : Appearance  >> Menu >> Create New Menu Called ” One Page menu”.
  • Step 2   : Add Menu items Example From Left side Click “custom Link”  You can see two fields Url And Menu Text.
  • Example : For Url #section-aboutus and  Link Text About Us.
  • Step 3 : Edit One page >> Page Options >> header >> Select Navigation Menu >> Here You should Select “one page Menu” Before you Created one.
  • After That in that Page Example :: About Us Section >> Edit Row >> General >> Id >> section-aboutus
  • So One Page Scroll Will work Perfectly.

  • Go to WooCommerce tab on your admin sidebar, and select the Settings tab.
  • Click on the Products tab at the top of the page. Click on Display Tab under the product tab.
  • Scroll down to see the Product Images section, you will find the Catalog Images, Single Product Images, and Product Thumbnails dimensions.
  • Enter the required Width and Height for the above image options.
  • The minimum suggest Width for our theme is 600px.
  • Navigate to Pages
  • Click Edit option on the required page.
  • Scroll down to see the Page Options tab.
  • Click on Header tab in Header items Options > custom > drag and drop topbar to Disable part.
  • Update the page.
  • You can disable the Footer Widgets in Theme Options settings.
  • Navigate to Theme Options > Footer.
  • Find the option Footer Items.
  • Drag footer Items to Disabled State.
  • Hit the Save changes button to apply your changes.
    • You can disable the Mobile Sticky Header in Theme Options settings.
    • Navigate to Theme Options > Header > Mobile Menu.
    • Find the option Mobile Header Sticky.
    • You can choose enable disable  Mobile Sticky Header here.
    • Hit the Save changes button to apply your changes.
  • You can disable the Sticky Header in Theme Options settings.
  • Navigate to Theme Options > Header.
  • Find the  Sticky Header Items > Sticky > Empty that Space.
  • Hit the Save changes button to apply your changes.
  • You can disable the Footer Widgets in Theme Options settings.
  • Navigate to Theme Options > Footer.
  • Find the option Footer Items.
  • Drag footer Items to Disabled State.
  • Hit the Save changes button to apply your changes.
  • You can setup a Homepage in Settings.
  • Navigate to Settings > Reading in your WordPress Dashdoard panel.
  • Select Front page displays to a Static Page.
  • Choose a page from the drop down menu for Front Page which will be your home page.
  • Leave empty for Posts page from drop down menu and Save the changes.
  • You can disable the Footer Widgets in Theme Options settings.
  • Navigate to Theme Options > Footer.
  • Find the option Footer Items.
  • Drag footer Items to Disabled State.
  • Hit the Save changes button to apply your changes.
  • You can create a Sidebar in Appearance.
  • Navigate to Appearance > Custom Sidebars.
  • Click on Add Sidebar button to create new sidebar and enter the name for sidebar. You can add as many sidebars as you need..
  • Once you have created, you need to add Widgets to your sidebar.
  • Navigate to Appearance > Widgets and find your sidebar on the right side of the page.
  • On the left hand side you will see all the widgets you can use, simply drag and drop the widget you want into your sidebar on the right hand side.
  • Make sure you click Save button to save the widgets added to your sidebar.
  • To use the sidebar for a page which you have created now, Navigate > Pages > Page Options > Sidebar, choose the sidebar from the drop-down lists.
  • You can use the sidebar for only Default Page Template.
  • You can enable Maintenance mode in Theme options.
  • Navigate to Theme options > Maintenance.
  • You can find Enable Maintenance Mode option.
  • There are two ways to enable Maintenance mode such as On ( Maintenance Default ) ,  (Coming Soon Default ) and On ( Custom Page ).
  • Select an Item for the custom page and if you would like to show a custom page instead of the standard page from theme. You should use the Maintenance Page template for this page.
    • You can add Google Map with multiple markers using Google Map Elementor shortcode.
    • Click on Add New Element from Elementor Tab and the popup window will open
    • Navigate to Theme Addons and you can find the Google Map.
    • Click on Google Map and the popup will open the Google Map Settings.
    • You can customize the map options, after that upload the Image for Marker and Navigate to Content Tab.
    • You can find the Title and Content for the Markers.
    • Enter a title for each marker position on Title area. Divide titles with linebreaks (Enter).
  • You have to install Contact Form 7 plugin to add contact form in your theme.
  • Navigate to Plugins > Add New and search Contact Form 7 plugin and install it.
  • After installing the plugin, Navigate to Page you want to add Contact Form.
  • Click on Add New Element from Elementor.
  • You can find the Contact Form shortcode from that elementor window.
  • Customize the contact form settings and save the changes.
  • You can enable sliding bar option in Theme Options settings.
  • Navigate to Theme Options > Header > Top Sliding bar Enable.
  • You can Enable/Disable the Sliding bar option.
  • You can Disable Sliding Bar on Mobile.
  • Sliding Bar Columns – Select the number of columns to display in the Sliding Bar.
  • To add content to the Header Top sliding bar settings, navigate to Appearance > Widgets here you can add widgets for top sliding bar.
  • You have to set responsive options in carousel settings.
  • Navigate to Slider in carousel settings
  • When you choose slider using shortcodes, you can find the options like Items To Display in Tablet, Items To Display In Mobile Landscape, Items To Display In Mobile Portrait.
  • Items To Display in Tablet – Enter the number of items to display in Tablet.
  • Items To Display In Mobile – Enter the number of items to display in Mobile  view.
  • You can change font family and sizes in Theme Options settings.
  • Navigate to Theme Options > Typography.
  • You can find the Body Font option.
  • You can also change h1 To h6 Heading fonts and font settings.
  • You can select font family, font-weight, Line Height, Font Size, Font Color for body font properties.
  • Likewise, you can change the font for Menu, Page/Post and Widgets.
  • Click Save changes button to apply the changes.
  • You can enable secondary menu option in Theme Options settings.
  • Navigate to Theme Options > Header > Secondary Menu Space Settings.
  • You can find the Secondary Menu option and enable it.
  • And You can Put widgets to secondary Menu in Appearance > Widgets > Secondary  Menu sidebar
  • Click Save changes button to apply the changes.
  • You can add your custom logo in Theme Options settings.
  • Navigate to Theme Options > General > Logo.
  • Also You have an option in Page  Options > General > Custom Logo., Sticky Logo.
  • You can Upload an image or insert an image url to use for the website logo.
  • Logo Padding – Choose the spacing for logo.
  • Sticky Header Logo – You can Upload an image or insert an image url to for the Sticky Header logo.
  • You can change the Header Layout in Theme Options settings.
  • Navigate to Theme Options > Header.
  • Find the option Header Layout.
  • Choose the Header Layout such as Wide or Boxed.
  • Hit the Save changes button to apply your changes.
  • You can drag and drop any header items to Left, Center, Right.
  • There is an Option For Topbar, Logobar , Navbar you can customize anything in it.
    • Yes, our theme support different languages and you can enable RTL for right-to-left language mode.
    • For RTL mode Navigate to Theme Options > General.
    • Find the option Enable RTL Mode, Click Yes to Enable it.
  • You can change the color Skin for your theme in Theme Options settings.
  • Navigate to Theme Options > Skin > Theme Skin.
  • Theme Color – You can choose your own color from  color Skin options for your theme. Also you can enable/disable the Transparent option.
  • Link Color – Choose link color for regular and hover options.
  • You can hide Page Title bar to any page in Page Options settings.
  • Just go to the page/post where you want to hide Page Title bar.
  • Navigate to Pages > Edit Page or Add New
  • Scroll down to see Page Options > Header > Page Title Bar.
  • Choose Yes from drop-down to Hide page title bar.
  • Navigate to Posts > Select Posts as Featured.
  • Navigate to Theme Options > Blog template >  Blog Featured Slider.
  • You can customize the Default Feature Post Slider settings like display option, number of post to display, Post Limit etc.
You can add Instagram to any wordpress page/post using Instagram Widget. Before adding Instagram, you need an Instagram account details to integrate with your account. To add Instagram widget, Navigate to Appearance > Widgets. You can find the Widget Instagram in left side of the page. Just drag and drop it in your required area. Click on the Instagram Tab and Enter the details of your Instagram details such as Title, User name, Number of Photos to show, Link Text, Link Target.
  • You can easily translate Language using Loco translate Refer link: Loco translate
  • You can add or overrite css usgin Appearance >> Customizer >> Additional Css
  • Child Theme >> Style.css
  • You can add or overrite the css in above both places.
  • Theme options >> Footer >> Footer bottom >> Copyright text >> Here you can change your text.
  • You can change header Custom text on Theme options.
  • Appearance >> Theme options >> Header >> Header logobar >> Custom text1,2,3 Here you can change Texts.
  • Same option For header Top and Logo bar too.
  • Its a file permission Issue.
  • So fix File permission To 777 for Wp-content folder.
  • Please check Appearance >> Menu >> your Main manu (Primary menu).
  • Bottom Of the page check if it is checked as Primary menu. If not Means check and save the menu.
  • Menu will disaply in front end.
  • You can hide Page Title bar to any page in Page Options settings.
  • Just go to the page/post where you want to hide Page Title bar.
  • Navigate to Pages > Edit Page or Add New
  • Scroll down to see Page Options > Header > Page Title Bar.
  • Choose Yes from drop-down to Hide page title bar.
  • You can enable Live Preview for  Theme options Changes.
  • Wordpress Dashboard >> Elementor Settings >> Bottom of the page >> Enable/Disable Customizer Auto Refresh Option >> Here you can enable.
  • You can enable Sidebar Sticky in Widget footer by using Text Widget or Custom HTML.
  • Wordpress Dashboard >> Appearance >> Widget >> Here you can enable by adding below code in Text Widget.
  • Set the Position of Form where want to display like top,middle,bottom (Example: align="middle")
  • Set the width for the Form. (Example: width="500px")
  • Place the icon class. (Example: icon_class="ti-email")
  • Place the Shortcode of the Form. (Example: [contact-form-3 id="7245" title="Enquiry Form"])
  • [apinae_sticky_element align="top" width="300px" position="top" icon_class="ti-email"]
    											[contact-form-7 id="6226" title="Enquiry Form"][/apinae_sticky_element]
  • Customize >> Theme Options >> Header >> Header General >> Advanced >> Select Advanced Menu in Main Menu Type.
  • Wordpress Dashboard >> Appearance >> Menus >> Select your Primary Menu and add Example Menu by using Custom Link
  • In Example menu you can select Style of the MenuExample: Default,Hot,New,Trend
  • Here you can enable Mega Menu and its Logo, Width ,Background image and Icon.
  • Create Sub Menu. Select style of the Menu Example: Default,Hot,New,Trend
  • Here you can Enable/Disable Menu Title.
  • Select your column from Mega Child Column and Choose Menu Icon.
  • Wordpress Dashboard >> Appearance >> Menus >> Create a new Menu.
  • Add One page menus by using Custom links and set the URL by section id. (Example: #section-top)
  • Enter name of the Menu in Link Text (Example: Home)
  • Wordpress Dashboard >> Pages >> Add New >> Create a new home page or keep your exist home page as One Page.
  • Edit apinae Page Options >> Header >> Select Navigation Menu >> Here Choose your One Page Menu.

For Search Engine Optimization

  • Set your Permalinks
    WordPress comes with a default permalink settings to allow you to change them as per your convenience and needs. These settings can be found in settings -> permalinks.
  • Create a sitemap for your website
    Your website can contain hundreds of pages and in order to get your web pages indexed by Google, you need to tell Google your website structure. Creating a Google XML sitemap is extremely easy. WordPress offers an extremely useful plugin called Google XML Sitemaps that automatically generates a sitemap of your website which will help search engines to better index your site.
  • Use Google Analytics
    Google Analytics is a popular analytic tool developed and offered by Google. It is absolutely free to use and helps you keep track of your website traffic. The tool lets you know about the traffic source, behavior and various other important attributes that will help you better reach your target audience.
    Google Analytics helps you perform a number of different chores including locating a 404 error page, examining the behavior of your visitors, source of your traffic, combating referral spam and so much more.
  • Use SEO Plugins
    WordPress also offers many SEO Plugins including Yoast SEO, All in One SEO Plugin and so much more that take care of your website and encourage you to add Meta title, Meta description, Meta tags, keywords and more. These plugins offer complete SEO solution that is available for WordPress.
  • Optimize your media
    Media is an important part of any website. However, they can either completely ruin or improve your SEO efforts. How you tag and name your images will determine your SEO. With proper tagging, you are most likely to improve your chances of being ranked higher in image searches.
    Just uploading an image with a complex name isn’t a good SEO practice. When uploading an image to your WordPress website, you get an option to change its title, add a small caption, alt text, and description. Leveraging these options can significantly improve your website’s search engine rankings. It’s important for webmasters to use reverse image search tool for adding quality image on their websites. It will help them to increase organic traffic.
  • Make your content Shareable
    Social Media has gained a huge popularity over the past few years. Today, almost every web user is active on various social media networks such as Facebook, Twitter, LinkedIn, Google+ and so much more. Making your content shareable allows your readers to share it across different social networks while driving huge traffic to your site.Adding social sharing buttons to your website not only drives traffic but also improves your website’s credibility. So, never take the social media power for granted
  • Producing High-Quality Written Content
    What is the most used SEO tactic for enhanced search engine rankings? It’s high quality, user-engaging content.Whether you are running a blog or a corporate website, you are going to need quality content to rank higher in the search engines.The idea of quality content is not only related to a post which is free of grammatical errors and spelling mistakes but also that appeals to the readers.
  • Using Correct Heading Tags
    In regards to good SEO practices, appropriately using heading tags is extremely crucial. However, if you are just a beginner, you might not be aware of heading tags and how to use them correctly.You can see heading tags in your editor, and are allowed to choose from heading 1 to heading 6.But which one to choose? You may ask.The H1 tag must always be employed for the title of the blog post and it is imperative to keep your H1 clear and informative. Your title should tell your readers what exactly your content is about and they must be interested in reading the entire content. Once you have used H1 heading correctly, you would want to use H2 tag for additional headings and then H3 and H4 tags for sub-headings and so on.Using heading tags is not only crucial for best SEO Practices but also for improving user engagement. It gives your users a better idea about your content and captures their attention in no time.
  • Hosting
    Everyone might know the fact that Google ranks a site based on page speed in 2019 and beyond. Apart from using regular SEO techniques, one need to use a good and reliable hosting for their sites. One thing that helped us to rank higher than our competitors is using hosting with SSD drives. Many big hosts like Hostgator, Bluehost use traditional hard drives, while there are some others you can count on like Fastcomet hosting since it comes with SSD drives.

Best WordPress Security Tips & Techniques we listed below
  • Keeping WordPress Updated
  • Passwords and User Permissions
  • The Role of Web Hosting
  • Use Best WordPress Security Plugin
  • Enable Web Application Firewall (WAF)
  • Move WordPress Site to SSL/HTTPS
  • Disable File Editing
  • Disable PHP File Execution
  • Limit Login Attempts
  • Add Two Factor Authentication
  • Change WordPress Database Prefix
  • Password Protect WP-Admin and Login
  • Disable Directory Indexing and Browsing
  • Disable XML-RPC in WordPress
  • Automatically log out Idle Users
  • Add Security Questions to WordPress Login
  • Scanning WordPress for Malware and Vulnerabilies

Sources and Credits

This section discloses the sources of various files used within the theme and describes their function. Use this section to gain an understanding on how the theme functions behind the scenes, if considering any type of modification.

Fonts:
  • Used Google Fonts For Full Theme. You can also change any google font.
Images:

Thank you for purchasing our Theme. We hope that you find all your questions regarding this Theme answered in this Documentation as much in details as possible. However, if you still need support, do not hesitate to contact us at our support forum for this Theme. If you have any questions that are beyond the scope of this help file, Feel free to post them on our Support Ticket center. Thanks so much!